
Learn how to use a clipper lighter like a pro with our comprehensive guide. From refilling to adjusting the flame, we cover it all. Perfect for beginners and seasoned users alike.
Lighters are one of the most essential tools in our daily lives. Whether you’re lighting candles, starting a campfire, or smoking a cigarette, a reliable lighter is a must-have. Clipper Lighters have become increasingly popular due to their unique features and eco-friendliness. Not only are they refillable, but they also have a removable flint that can be used as a poker or tamper.
However, using a Clipper Lighter may not be as straightforward as you think. To ensure the longevity of your lighter and avoid any mishaps, it is crucial to learn how to use it properly. In this comprehensive guide, Clipperreview‘ will walk you through the basics of a Clipper Lighter, including how to refill it, adjust the flame, and troubleshoot common issues.
Whether you’re a seasoned Clipper Lighter user or a newbie, this guide will equip you with all the information you need to master the art of using a Clipper Lighter. So, let’s dive in and discover the ins and outs of this unique lighter.
Understanding the Anatomy of a Clipper Lighter
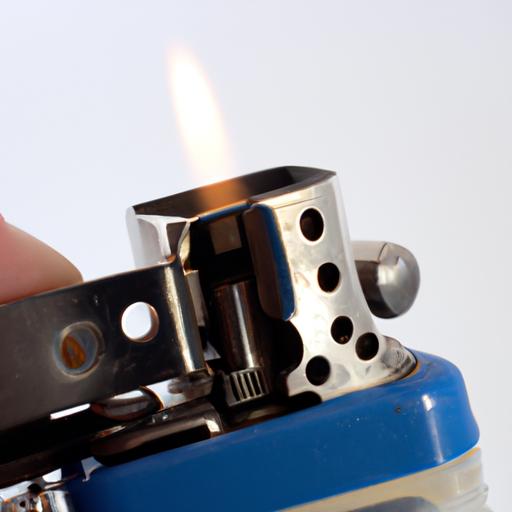
If you want to use a Clipper Lighter effectively, it’s important to understand its anatomy. Clipper Lighters have a unique design that sets them apart from other lighters. Here is a breakdown of the different parts of a Clipper Lighter:
The Body
The body of a Clipper Lighter is made of sturdy plastic and comes in various colors and designs. It is ergonomically designed to fit comfortably in your hand and has a textured surface for a better grip.
The Gas Chamber
The refillable gas chamber is located at the bottom of the lighter. It is transparent, allowing you to see the level of gas inside. Clipper Lighters use butane gas, which is easy to find and inexpensive to refill.
The Flame Adjuster
The flame adjuster is located at the bottom of the lighter, just above the gas chamber. It allows you to adjust the size of the flame to your liking. You can turn the adjuster clockwise to increase the flame or counterclockwise to decrease it.
The Removable Flint
The removable flint is located at the top of the lighter and can be easily removed with a small screwdriver or other tool. It can be used as a poker or tamper for smoking accessories.
Maintaining your Clipper Lighter is essential for its longevity. Regularly refill the gas chamber and clean the lighter with a soft cloth to prevent any debris from clogging the flame adjuster. Understanding the anatomy of your Clipper Lighter will help you use it more effectively and ensure its longevity.
Refilling a Clipper Lighter
Refilling a Clipper Lighter is a simple process that can save you money and reduce your carbon footprint. Here’s a step-by-step guide on how to refill your Clipper Lighter:
Step-by-Step Guide
- Hold the lighter upside down and locate the refill valve at the bottom.
- Insert the nozzle of the butane gas canister into the valve and firmly press down.
- Keep the gas canister in place for a few seconds to allow the gas to flow into the lighter.
- Remove the gas canister and wipe off any excess gas from the lighter with a cloth.
- Wait a few minutes to allow the gas to settle before using the lighter.
Safety Measures
When refilling your Clipper Lighter, it is important to take certain safety precautions to avoid accidents. Here are some safety measures to consider:
- Always refill your lighter in a well-ventilated area to avoid inhaling butane gas.
- Keep the lighter away from flames and heat sources during the refilling process.
- Use a high-quality butane gas canister to ensure the safety and longevity of your lighter.
Tips and Tricks
Refilling your Clipper Lighter can be a breeze if you follow these tips and tricks:
- Use a butane gas canister with a long nozzle for better precision and control.
- Refill your lighter before it runs completely out of gas to avoid air pockets and ensure a smooth refill.
- Hold the lighter upside down during the refill process to allow the gas to flow into the lighter more easily.
By following these simple steps, safety measures, and tips and tricks, you can easily refill your Clipper Lighter and enjoy its benefits for a long time to come.
Adjusting the Flame of a Clipper Lighter
A Clipper Lighter’s flame is adjustable, making it versatile and suitable for various purposes. There are three flame settings on a Clipper Lighter: low, medium, and high. Each setting serves a different purpose, from lighting candles to smoking a cigarette.
Understanding the Different Flame Settings on a Clipper Lighter
- Low Flame: The low flame setting is ideal for lighting candles or starting a fire. It produces a small, low-intensity flame that is perfect for delicate tasks.
- Medium Flame: The medium flame setting is suitable for lighting a cigarette or joint. It produces a medium-sized flame that is hotter and more intense than the low flame setting.
- High Flame: The high flame setting is the most intense and produces a large flame that is useful for lighting larger objects such as campfires or barbeques.
Step-by-Step Guide on How to Adjust the Flame
Adjusting the flame on a Clipper Lighter is a simple process. Here’s how you can do it:
- Hold the lighter upside down and locate the flame adjuster at the bottom of the lighter.
- Turn the flame adjuster clockwise to increase the flame size or counterclockwise to decrease it.
- Test the flame size by lighting the lighter. If the flame is too small or large, adjust it accordingly.
Importance of Having the Right Flame Setting for Various Uses
Having the right flame size is crucial to ensure the longevity of your Clipper Lighter and avoid any mishaps. Using a low flame setting for tasks that require a high flame setting can cause damage to the lighter and reduce its lifespan. On the other hand, using a high flame setting for tasks that require a low flame setting can be dangerous and cause accidents. Therefore, it’s essential to choose the right flame setting for every task to ensure the safety and effectiveness of your Clipper Lighter.
Common Issues with Clipper Lighters and How to Fix Them
Clipper Lighters are known for their durability and reliability. However, like any other tool, they may encounter some issues over time. Here are some of the most common problems with Clipper Lighters and how to fix them.
Overview of Common Problems with Clipper Lighters
1. Weak Flame
If your Clipper Lighter produces a weak flame, it may be due to low gas levels or a clogged nozzle. To fix this, try refilling the lighter and cleaning the nozzle with a pin or a toothpick.
2. Difficult to Refill
Sometimes, Clipper Lighters may become difficult to refill due to a faulty valve. To fix this, try adjusting the valve with a screwdriver or a pair of pliers. If this does not work, you may need to replace the valve altogether.
3. Flint Won’t Spark
If your Clipper Lighter’s flint won’t spark, it may be due to a worn-out flint or a loose screw. To fix this, try replacing the flint or tightening the screw with a screwdriver.
Troubleshooting Tips and Solutions for Common Issues
1. Gas Leaks
If you notice gas leaking from your Clipper Lighter, it may be due to a faulty valve or a damaged seal. To fix this, try tightening the valve or replacing the seal. If the problem persists, you may need to replace the lighter altogether.
2. Flame Too High or Low
If your Clipper Lighter’s flame is too high or low, it may be due to a misaligned flame adjuster or a clogged nozzle. To fix this, try adjusting the flame adjuster or cleaning the nozzle with a pin or a toothpick.
Importance of Regular Maintenance to Avoid Issues
Regular maintenance is crucial to ensure the longevity of your Clipper Lighter and avoid common issues. Make sure to refill the lighter before it runs out of gas, clean the nozzle and valve regularly, and replace worn-out parts as needed. By following these simple steps, you can enjoy the reliability and convenience of your Clipper Lighter for years to come.
Conclusion
In conclusion, Clipper Lighters are an excellent choice for anyone looking for a reliable, eco-friendly lighter. By understanding the anatomy of a Clipper Lighter, you can ensure its longevity by regularly maintaining it and avoiding common issues.
Refilling and adjusting the flame of a Clipper Lighter can seem daunting at first, but with practice, it becomes effortless. Remember to always follow safety precautions when handling gas, and be patient when waiting for the lighter to reach its optimal flame level.
By following the tips and tricks outlined in this guide, you can guarantee a smooth and hassle-free experience with your Clipper Lighter. Don’t forget to regularly clean and maintain your lighter to ensure its longevity.
As a Clipper Lighter user, you are making a conscious effort to reduce your carbon footprint, and that is something to be proud of. At Clipper Reviewer, we are committed to providing you with the latest information and reviews on Clipper Lighters. So, keep using Clipper Lighters and spreading awareness about their eco-friendly features.